Revision [461]
This is an old revision of W126GuideRod made by WebMaster on 2006-11-01 16:46:26.
Suspension Guide Rod Replacement
on the 1985 300SD
by whunter
4/27/04
USE AT YOUR OWN RISK.
Personal opinion; even I do not like doing guide rods, with a full auto shop and hoist.

*Guide Rod replacement for Mercedes Benz 300SD.*
1) Raise and support front end.
2) Remove front wheels.
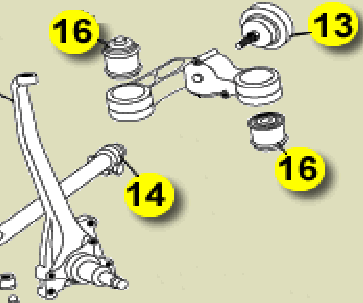
3) Loosen the clamp on #14 in picture.

4) Remove the bracket that joins the guide rod mounts.
5) Remove the bolts that hold the guide rod mounts to the body.
6) Unscrew the guide rod from the mount pod.
7) Unscrew the four bolts from the mount pod backing plate.
8) Press the guide rod from the mount pod.
9) Clean the guide rod socket of the mount pod, the old steel sleeve must be removed to clean aluminum surface.
10) Grease the guide rod socket of the mount pod, axle grease is ok.
11) Grease the guide rod sleeve, axle grease is ok.
12) Press the guide rod by the sleeve; into the mount pod, stop when it is flush or roughly one mm above the surrounding surface.
13) Install the rubber impact buffer pad and cover with four bolts.
14) Tighten the four bolts in the mount pod backing plate.
15) Screw the guide rod into the from the guide rod sleeve.
16) Install and tighten the bolts that hold the guide rod mount to the body.
17) "Loose" install all the bolts that hold the bracket joining the guide rod mounts.
18) Tighten all the bolts for the bracket joining the guide rod mounts.
19) Tighten the clamp on #14 in picture.

20) Install front wheels.
21) Remove front end supports and lower car.
22) Torque front wheel bolts.
If the Suspension Bearing Bracket is too corroded inside, don't repair/replace the guide rod, get NEW Suspension Bearing Bracket !!!
Note: this part number is the same for all W126 chassis.
Call Phil for this part, it is not online.
1-888-333-4642
Mon-Fri 9:00a-7:00p ET
(NOT for technical support)
Here are pictures of the old parts:
Image-1

Image-2

Image-3

Image-4

Image-5

Image-6

Image-7

Discussion of this DIY can be found here.
- whunter
CategoryDiy