Revision [181]
This is an old revision of OM606962GlowPlug made by WebMaster on 2005-04-10 13:02:25.
Ok guys, here it is. The mystery is no more. I will outline the glowplug replacement process, including intake manifold removal.
Tools required
- Ratchet and socket set with extensions
- torx bits/sockets
- allen bits/sockets
- torque wrench
- Glowplug reamer (optional)
- degreaser/carb cleaner
- rolls of paper towels for black goo
- Needlenose pliers
- Flat band clamp pliers
Parts required
- 6 glowplugs
- 1 intake manifold gasket
Reasonably competent shade tree mechanics should be able to change their own glowplugs and fuel hoses without paying hefty dealer charges. I changed my glowplugs today with $130 in parts. Most pay $600 at the dealer.
1. The first step is safety. Make sure your car is safely on ramps, a lift or jackstands before you get under your car. Apply the parking brake, and wheel chocks if you have them. Work on a cool engine and use proper hand and eye protection. Don't take chances with your safety. Ok disclaimer over
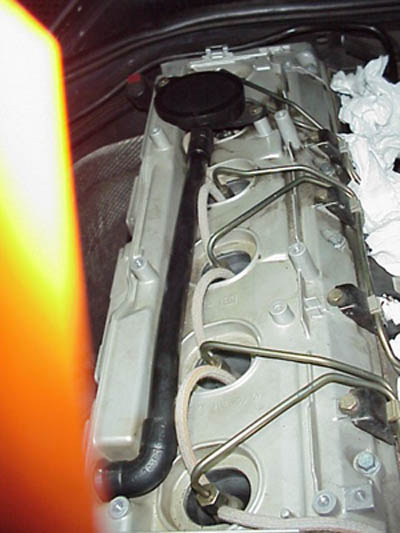
2. The first step is to remove the valve cover cover. It takes basic allen sockets/bits to remove and comes off easily. If you have trouble with this step, I highly suggest you take your car to the dealer to have the glowplugs changed. While this cover may not be 100% necessary to remove, its good to inspect the integrity of the CCV puck and it's connections, and clean that area. The main reason for removing this cover is so that when you reinstall the manifold you have more room to work with, and have less of a chance of breaking off those flimsy plastic clips that hold the fuel lines in place. Be very careful not to break those and have plastic pieces fall down into the head.
Here is what the valve cover looks like with the cover off:
3. Remove the windshield washer bottle. There is just one nut holding it down, remove the nut, and unplug the sensor from the top. Then using band clamp pliers or needlenose if you're skilled, loosen the clamps on the washer fluid hoses, and remove the hoses. Be careful as fluid will come out of one of them. No problem, just open the reservoir and let it drain back in. Once you've done this, the reservoir is free to pull up and move up near the fuse area and out of the way.
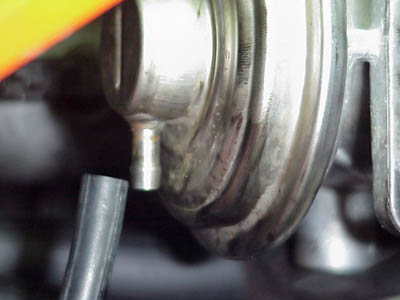
4. Removing the intake manifold. There are several TORX nuts holding the manifold to the head. Remove all of them from the top side of the manifold. look to the right side of the throttlebody/egr valve, and you will see a clamp holding the EGR assembly to the corrugated pipe that comes around from the exhaust manifold to the back of the egr. (Evil, evil pipe). Loosen this clamp with a 10mm socket and extension. Remove the bolt, and clamp. Now get underneath the car, and you'll see another 10mm bolt, I believe of a golden color, which holds the intercooler pipe to the egr. Unscrew this screw. Now remove the 2 vacuum hoses from the EGR. Here is a pic of the one on the EGR valve. Pull it off.
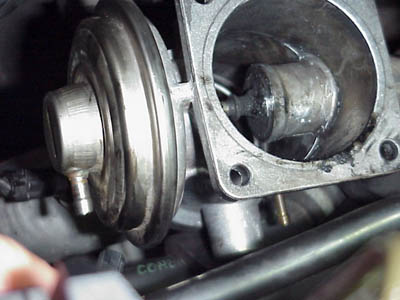
and the other vacuum hose nipple you can see on the lower right with the hose already removed...
here's a pic of the corrugated pipe that meets the back side of the egr, where the clamp is...
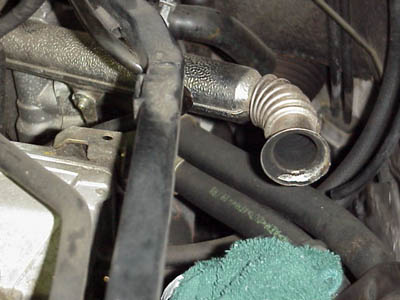
Here's the clamp:

Once you've removed the clamp, lower bolt, EGR vac hoses, and intake bolts, the manifold is now free. Pull UP. The EGR assembly remains attached to the manifold and comes up together. Heres what the intercooler pipe and corrugated pipe look like after the manifold is pulled off. You can also see the hole to the right of the intercooler pipe where the bolt must come out from the bottom. It comes up thru this hole and threads into the egr/throttle body when the manifold is reinstalled.
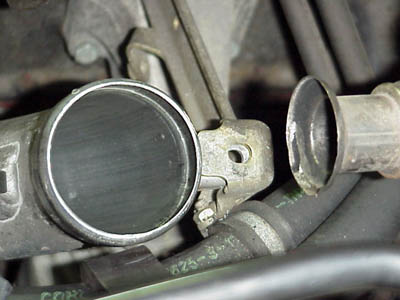
STUFF rags in the holes in the head, so nothing falls in there. As you can see I used the luxurious Brawny rags :-) Also stuff a rag in the intercooler pipe. Here's a pic:
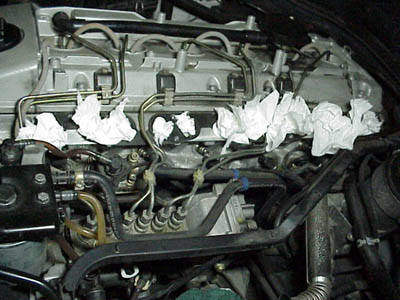
Here's the intake manifold removed...
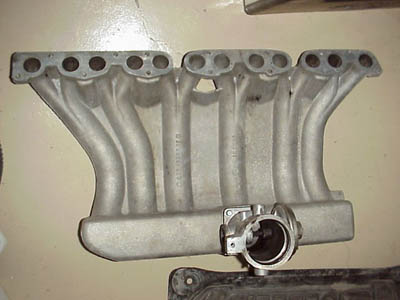
here's a closer shot of the EGR mounted on the manifold. No, it's not that clean when it comes off
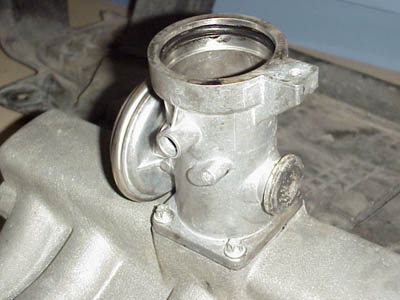
5. Clean your intake manifold. You can use various acids, degreasers, brushes or carb cleaner. The black goop on there is thicker than it looks and hard to get out. I found that biodiesel dissolved the goo quite easily, 10 times easier than carb cleaner or grease lightning etc. If you have bio, or maybe even diesel fuel, set your intake on the grass, and fill it up to the brim and let it soak. It will look sparkly clean and silver after, like this...This will really restore lost performance and cut down on smoke due to more airflow.
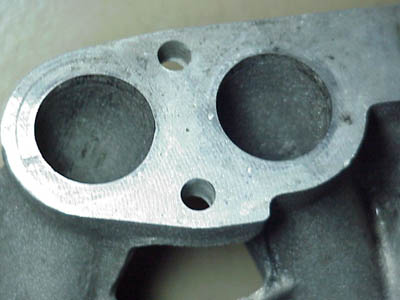
6. With the manifold rinsed and drying, it's time to get at the glowplugs. Use needle nose pliers to remove the glowplug caps. Squeeze them gently on each side and pull out toward you. They wont give you any trouble. Easier than spark plug caps.
7. Using a deep socket and extensions, CAREFULLY unthread your glowplugs. DO NOT MUSCLE THEM OUT. THE BIGGEST AND MOST EXPENSIVE MISTAKE YOU CAN MAKE IS BREAKING THEM OFF IN THE HEAD. You'll find they are torqued in there reasonably tightly, but they will give with a little effort. I was hesitant at first to apply any pressure for fear of breaking one. This was good. I tried a different one and it came out more easily. I then sprayed penetrating oil on the stiffer one, and worked on the rest. They all came out easily except for one. I gently attempted to tighten/loosen the plug back and forth a bit, and it came loose easily. Sorry I dont have a pic of the plugs but they are a no brainer, like spark plugs. Look at the new ones you have if you really dont know what you're looking for. Once they are unthreaded, pull them straight out. If they are stuck due to carbon deposits etc, DO NOT try to force them out. Spray penetrating lube down the holes and wait a few mins. THen gently twist and pull them and they should come loose. Again, do not force it and break them off in the head!
Here are my old (52k on them) glowplugs:
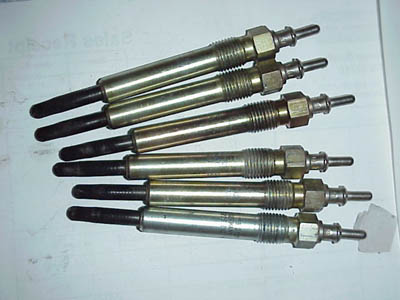
8. Optional step - necessary if plugs were very carboned or stuck. I would recommend this step every time, but I wasn't able to due to not having the tool. I have it on order. - Get the appropriate glow plug REAMER tool from mb. RUn the reamer into the glowplug holes to break up carbon and make room for the glowplug. Doing this regularly in my view should help prevent the stuck glowplug/breaking off in the head problem.
9. Install the new glowplugs.You may also want to dab a little anti-seize on the threads. Thread them in and torque to 27NM. Install the glowplug caps, they will push on with an audible CLICK.
10. Remove old intake manifold gasket and clean head's surface. Remove all rags from the head.
11. Align and lay out new intake manifold gasket. Don't worry about it staying totally in place at this point.
12. Reinstall intake manifold onto intercooler tube, and be sure the egr assembly is 'plugged in' to the corrugated pipe. Install the clamp to hold them together, however just tighten enough to get the bolt threaded at this point. Be sure the egr is firmly seated on the intercooler pipe, and the manifold is seated flat on the head. Might take a little push to get it down flat.
13. Using a flashlight, look down the holes on the top of the intake manifold. If the gasket is lined up, install the bolts. If not, lift up very slightly on the manifold, and using a thin/long screwdriver, scoot the gasket until the holes line up. I suggest doing this at one and and then the other. Once you've done that, it's pretty well lined up. Be sure it's totally lined up with one more center bolt, and then reinstall all the manifold bolts. Thread them until they are all snug, not too tight. Then working from the center out, in a top bottom top bottom order, torque these bolts to 20NM, or 14 ft lbs.
14. Tighten the clamp on the corrugated pipe/EGR. Re-attach the two vacuum hoses.
15. Go underneath and reinstall the bolt thru the intercooler pipe to the egr assembly. This will require probably 2-3 extensions.
16. Double check your torque on all bolts.
17. Reinstall washer reservoir, hoses, plug, and nut. Double check everything to make sure you've got everything right, and cleaned up all tools from the engine compartment etc.
18. Reinstall valve cover cover. Tighten bolts to snug.
19. Close hood, start the car up. It should glow and start perfectly, possibly a slight stumble on the very first start. Your glowplug light should have gone out but check engine light will stay on. Look under the hood for any leaks, although there shouldn't be any if you installed the gasket correctly on the manifold. It's also probably a good idea to retorque or check the torque on the manifold bolts after coming back from your first drive.
20. Go to Autozone or equivalent and they will clear the code for free. The OBD port is covered by a little plastic door, down near your shin area, by the parking brake. Standard area and standard OBD plug, will work with all scanners, don't let them tell you any differently
Ok guys, I'm done. I hope this has been a help and has demystified the E300 manifold removal and glowplug change!! No more expensive dealer glowplug visits every 40k!! I've saved a lot of money due to help from internet auto forums and members so here's my turn to give something back. Enjoy!
CategoryDiy