Replacing the mini electric cooling fan belt
on the 1999 W210 E300D
by uberwgn
8/8/06
Here's a brief pictorial covering the replacement of the mini-fan belt for the electric fan in front of the radiator. Subject car is a 1999 E300D. It's my understanding that this same design is found on some of the gas engine cars. It should be easy to visually identify. I can spin the right fan by hand and the left fan spins at the same time
Written procedure courtesy of Matt L:
- Remove the plastic guard
- Remove clips that hold the radiator to the core-support top cross-member
- Remove the top cross-member itself (unclip the cable for the hood release underneath)
- Undo the three (two on my car) bolts holding the power-steering cooling line so it can be pushed out of the way (this line need not be disconnected).
- Remove the horn and hood bumper and the bracket that holds them to the front bumper frame
- Undo the electrical cable connection (remove plastic cover to access)
- Remove the two bolts at the top of the fan assembly. Lift fan assembly out
My picture numbering will correspond to the above text.
This job is quite simple. A few basic hand tools and two sockets are needed . I took this opportunity to clean up the A/C condensor and vacuum out a lot of bugs and stray leaves. I took my time (about 1 hour) and made everything nice, admired the amazing gaskets/seals/weather-stripping the Germans love to incorporate in their cars and condition rubber seals & mounting points.
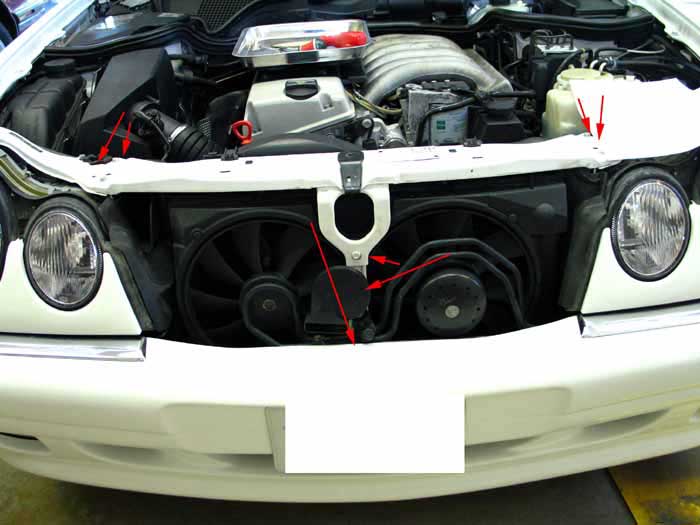
Step 1. (two plastic tabs are rotated CCW 90 degrees. This light, plastic guard is lifted straight up and set aside)

Step 2. (two "M" shaped clips with rubber insert pull straight up and release top edge of radiator)

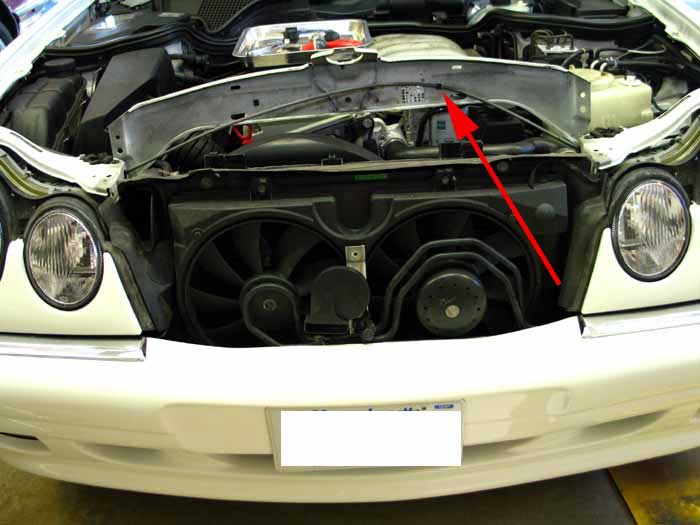
Step 3. (remove the 4 bolts atop the cross member. I just folded the sheet metal back and did not disconnect the hood release cable clip - - see lower foto)


Step 4. (You need to remove the power steering bolts, pictured below, before you can access the final bolt holding the bracket in the picture above)

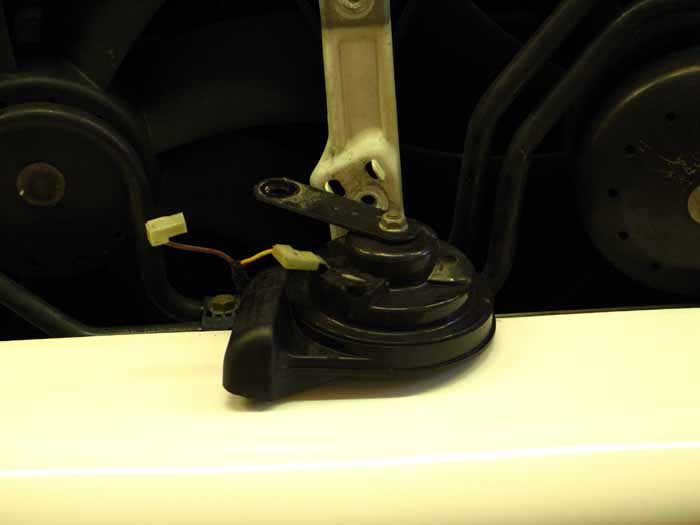
Step 5. (remove 3 lower bolts, remove the bracket, the hood bumper and horn)


Step 6. (remove the plastic cover and disconnect by squeezing the two tabs, pull cable off)

Step 7. (once the two screws are removed, this fan assy will left up and out. I had to wiggle it around to get is passed the PS cooler lines.)

here's the rear view of the assy once removed, it's fairly heavy.

I made it a point to clean up all rubber mounts and used a rubber conditioner.
My belt was running inside out. It had burned its mirror image in the plastic shroud. I'm glad I checked this.

Dirty:

Clean :

Belt info:


While I have things apart I lubed points as necessary, condition rubber, used contact enhancer on the connectors and applied a little synthetic spray wax on painted surfaces that I don't normally have access to.

The rubber insulators within the "M" shaped clip were not in very good condition on this car - - they're always exposed to high temps. One was split in half. I've ordered a few new ones to do all the cars. They seem to be used across many model years.
(Belts were ordered thru Phil ($20 for two of them incl. shipping) and I had them next day. I ordered the 2nd belt to do another car this weekend.)
Gilly's comments regarding this DIY:
This is a good write-up. I've been talking to Tom about a slight change in the procedure that I used when I was wrenching, and Tom asked that I list the differences here.
The steps I would change a bit:
First remove the plastic cover as Tom has shown.
After that, remove the single bolt retaining the horn and small hood support bumper. (remove horn wires and set those aside, noting which was on top, the horn or the bracket)
Then remove the 2 screws holding the pipe (this is to cool the power steering fluid).
The pipe assembly can be pulled up slightly and then pulled forward and rested on top of the bumper cover. Use an old towel or what have you to prevent marking up the painted bumper surface. The 2 plastic clamps the 2 screws go through may shift a bit, they are easily reposition to where they need to be.
Next, below where the pipe was secured, in the center, remove the single bolt retaining the center of the radiator support, no need to unscrew the painted bolt up above where the horn was, you just make it look bad and no reason to remove it. Then take out the other 4 screws securing the radiator support and from there just follow Toms instructions.
A few other items I'd like to note:
Prior to cleaning the condensor, which you really should do, look it over for signs of an oil leak, this would be caused by a leaking condenser, the compressor oil will leak out along with the freon. This tells you it'll be time for a condensor soon, and a recharge.
When the front horn is removed, blow the horn to see if the other horn works OK or sounds weak, this tells you the other horn, the one under the right headlight, should be replaced. If you don't hear anything, you need a new horn.
There is also a rubber seal that seems to be missing on Toms car, it can hide the 2 bolts that secure the fan assembly. If you look through Toms pictures you will see the 2 sets of bolts I'm talking about, you need to remove the pair which are closest together, the wider pair are for the condenser.
Discuss this DIY here.
-uberwgn
CategoryDiy