 |
| Introduction: This is the first in a series of articles designed to help the individual Do-It-Yourselfer be able to service their own cars. If you have any doubts or are uncertain of your ability to complete these procedures we advise you to seek professional assistance from a qualified technician. We have selected a 1995 E420 and 1998 E430 to illustrate the procedure for replacing brake pads. Other E-Class vehicles may utilize similar but not exactly the same steps described below. Be advised: PeachParts accepts no liability for the information contained within this procedure nor for any adverse outcomes as a result of following this procedure. In other words...the risk is 100% YOURS. |
|
1995 E420 W124 Used For Illustration |
|
 |
Tools Needed: Hammer, nail set, (large) flathead screwdriver, stock tool kit, stock jack, jack stand, rubber/latex gloves. Tool for compressing the piston into the caliper, or a pair of slip joint pliers.
|
|
Materials Needed: We suggest that you use genuine Mercedes parts. For a 95 E420 W124 chassis new front brake pads (part # 002-420-37-20), new rear brake pads (part # 001-420-95-20), rear brake pad-wear sensors (part # 126-540-20-17), common brake pad-wear sensors (part # 140-540-12-17), Mercedes brake pad paste (part # 001-989-10-51). |
|
|
Procedure |
|
 |
 |
| You begin by raising the hood, uncapping the brake-fluid reservoir, and fitting a rag over the top of the fluid reservoir. It is always a good idea to set the parking brake when doing work such as this. | |
 |
Next you "break loose" the lug nuts on the first wheel at the corner you plan to start with. Loosen the lug nuts just a ¼ turn or so such that they are still snug but can be turned easily with the lug-wrench supplied in the stock MB toolkit. |
 |
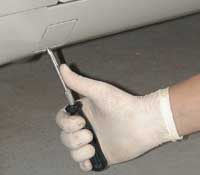
You then pry off the cover of the lift-tube with the screwdriver. With this cover removed you insert the arm of the jack into the jack support tube and raise the vehicle high enough so that a jackstand can be placed underneath the factory support points. Place the jackstand underneath the factory support points. You may now remove the lug bolts and wheel/tire. For ease of maintenance you may want to turn the wheel so that the rear of the wheel is protruding out of the wheel-well. This provides better visibility and access to the caliper and pads. If you are turning the wheel while the car is jacked up be careful not to open the driver's door into the jack. Slightly open the door, then lower a window. Whenever you have the wheel removed it is a good idea to feel the edge of the brake rotors. You are feeling for any excessive "lip" that might have developed. If you have any doubts as to the integrity of the rotor see a qualified professional for a detailed inspection. |
 |
 |
| Using the pliers from the stock toolkit, grasp and remove the sensors. |

|
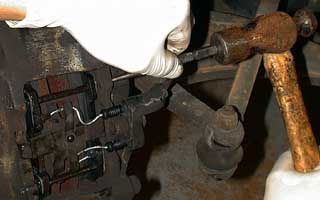
| With the sensors removed the next step is to use the hammer and nail-set to pop the cross pins out. Place the head of the nail-set on the tip of the pin and tap it out. You wont get it all the way out with tapping but just get it free of the first half of the caliper. Then take a screwdriver compress the spring plate and pull the pin the rest of the way out. Repeat for second cross pin. With the pins removed gently remove the spring plate. |
 |
 |
| You are now ready to begin freeing the pads. Take the large flathead screwdriver and pry the pad away from the rotor. This pushes the pistons back and allows you to remove and insert the pad. Remove the first pad. | |
 |
 |
| Insert the new sensors into the new pads. Make sure you have the sensors fully inserted as shown in the picture on the right. | |
 |
 |
| Apply brake pad paste to the backing plate on each pad and a small amount on the top edge as shown. Also apply paste to the spring plate where it touches the brake pads and to the pins. | |
 |
| You now insert the pad into the place of the spent pad with the greased side facing the piston. You then take the large slotted screwdriver and pry the pad on the other side of the rotor and repeat the same process. |
 |
| With the new pads in you must put the spring-plate back in and insert the pins over the top of it. After inserting the first pin over the spring-plate take the screwdriver and pre-compress the other half of the spring plate while inserting the second cross pin. Use the hammer and nail set to tap the pins flush from the back. When completed the spring plate must be parallel with the line of the pads and rotor (perpendicular to the cross pins). Next, plug the sensors into the female ends of the bracket. Once securely plugged push the sensor wires neatly back out of the way as shown. |
 |
 |
| Make a final inspection of all the above steps and put the wheel back on. To do this, first screw in the alignment bolt supplied in the toolkit. With the alignment bolt in place put the wheel back on the vehicle. Push the wheel onto the hub and hold while inserting the lug bolts. Lightly tighten the lug bolts skipping every other nut in a "star" pattern. You may now remove the jackstand and lower the vehicle down onto the tire. Make a final tightening of the lug-nuts torqueing each to 85 ft-lbs in the "star" pattern. Repeat above procedure for other front wheel. Note: rear wheels similar except that the rear caliper is a double piston caliper as opposed to the 4 piston front brakes. | |
 |
 |
| Reinstall the covers for the jacking points and screw on the cover for the brake-fluid reservoir. | |
 |
When all the brakes are finished remember to pump the brake pedal several times until firm. You should now be ready to drive on your newly installed brake pads. |
|
W210 V8 Models (E420/E430) |
|
Additional tool: Slip-joint pliers or special tool for compressing of brake pistons. Note: part #'s are different for W210 brakes but the procedure and type of parts (pads, paste, sensor) is similar with a few variations. Those variations are as follows: Follow above directions for safe removal of wheel/tire. |
 |
| The procedure for changing the front brake pads is different on the 210 chassis because it has floating, single piston calipers versus the 4 piston fixed type on the W124. With the 210 chassis cars turn the wheel so that the front of the tire protrudes from the wheel-well. With the tire removed take your flathead screwdriver and gently pry the spring retainer loose. You may then remove the single sensor in the same fashion as described above on the W124 model. |
 |
| Then go around to the back of the caliper and pry off the cover of the Allen-bolts. |
 |
| Remove the 7mm Allen-bolts. With the Allen-bolts removed, the pads should be easily removable. Compress the piston into the caliper with a set of slip joint pliers or a brake piston tool. Lube and insert the new sensor to the pad. Then, just install in reverse of above. Follow up with a final inspection of all work done, final torqueing of the lug-nuts, and pumping of the brake pedal till it feels firm again. |
CategoryDiy